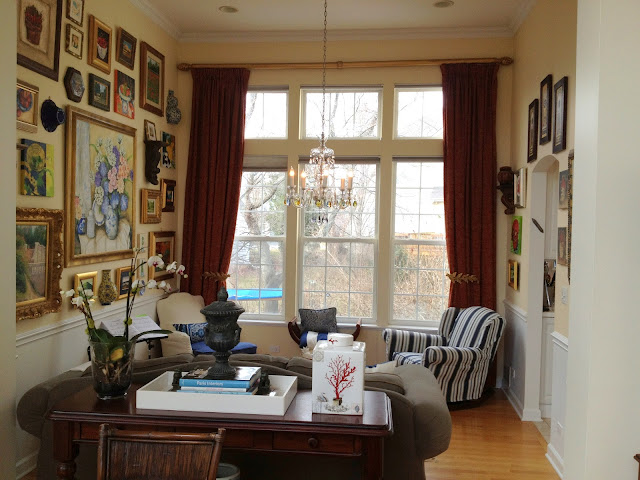
As my friends know I can rarely resist a great redo...plus she is a dear friend! She also runs a wonderful home...the kind you always want to be in because the food is so good and the company is so warm! She has lived all over the world and has collections from her travels... so this was a fun project.
I thought I would share our work....
Here is the "before" of her dining room....
and then we turned it into a fun sitting room that overlooks her garden....
Her living room before.....
became the new dining room afterward...

We took artwork and accessories from other parts of the house where they created less impact...
and grouped it all together to make a meaningful collection.....
We even spent some time in her kitchen and created a workable little vignette in between her kitchen island and her kitchen table...a great place for a cup of coffee or a chat with a girlfriend! We placed the table behind the chairs as a nice little station for drinks, etc. for when she entertains. The door outside is immediately to the left of the table and leads to a wonderful stone patio.
The best part of this whole project was the smile on my friend's face as we ended our day! It will also be rewarding when she tells her husband we did all this without spending one penny!
But frankly, the most rewarding aspect of any successful redo is the renewed love of one's space. I loved being able to help create that for my friend who is an aesthetic junkie...just like me.
As I quickly took a few pictures at the end of our day...I missed getting the best picture of all....
a picture of us together...exhausted but exhilarated...high on design!


Love the gallery wall. So well done!
ReplyDeleteOh this is stunning! I want all of the art and the pot with the coral on it!
ReplyDeleteMerci'!!
ReplyDeleteOk, this looks professionally done. I love everything!
ReplyDeleteThanks Tiffany!
DeleteFabulous! Now, come do my house. :) ~Kelly
ReplyDelete:) Thanks!!
DeleteI agree. Please come and do my house now! This is just fabulous Emily! thank you so much for linking up at Thriving on Thursdays.
ReplyDelete(I'm in the process of doing my place and looking for all the help I can. This is great.)
Anne xx
I am glad you enjoyed it Anne. Thanks for visiting!
Deletewow! love the difference! maybe you could come over to my house. . . :)
ReplyDeleteThanks Laura! It was a fun if not tiring project!! :)
DeleteHi Emily, I'm visiting from Shabby Creek Cottage. I LOVE this gallery wall. I'm slowly working on getting a bunch of old family photos framed (thrift store/yard sale frames) for a gallery staircase wall, and I love your combination of materials and how it's so interesting. How did you hang the jars on the top right and bottom center? Thanks so much for sharing!
ReplyDeleteMarilyn- thanks for visiting! I hung the jars very easily because they were already "halved" and had openings at the back for hanging already in them. She had them in another part of the house alone and we thought they would add nice texture to the wall. I think combining elements is often the best way to create an interesting wall design. Good luck with yours!!
DeleteThis comment has been removed by a blog administrator.
ReplyDeleteHolly, Thanks so much for visiting and for the nice compliments and features. There is nothing more gratifying than a fun makeover...glad you liked it!! Have a great weekend!
Delete